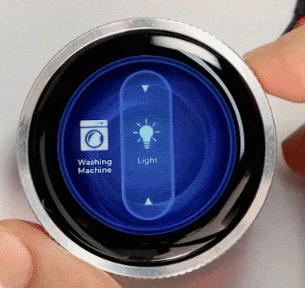
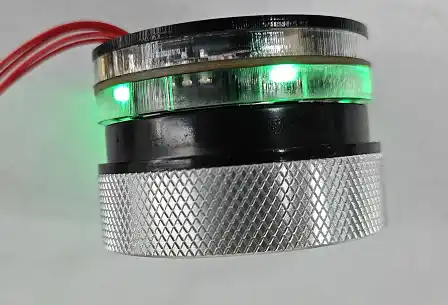
CrowPanel 1.28inch-HMI ESP32 Rotary Display 240*240 IPS Round Touch Knob Screen
What is a rotary screen?
The rotary screen is an intelligent interactive device that usually consists of a circular knob and a display. The knob can be rotated to control various functions, while the display is used to display relevant information.
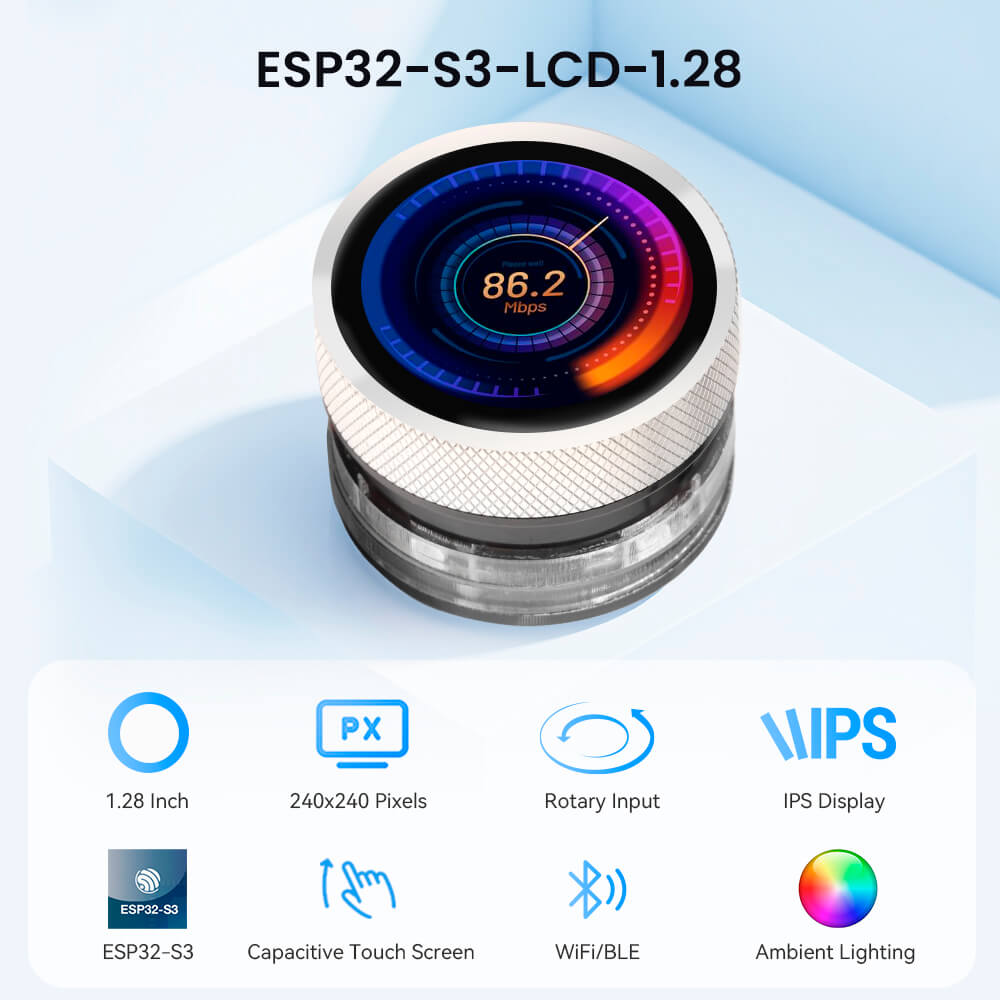
ESP32 Display - 1.28 inch rotary screen, uses high-performance ESP32-S3 chip, equipped with 32-bit dual-core chip. The maximum clock frequency reaches 240MHz, with strong performance and the ability to handle complex tasks.
Supports 2.4G WiFi and BLE low-power Bluetooth, to achieve reliable wireless communication, easily connect to the Internet, suitable for smart home, industrial control, portable devices and other scenarios.
Supports capacitive touch operation and knob input. The knob supports clockwise, counterclockwise rotation and full press operation, smooth feel, and various interaction methods.
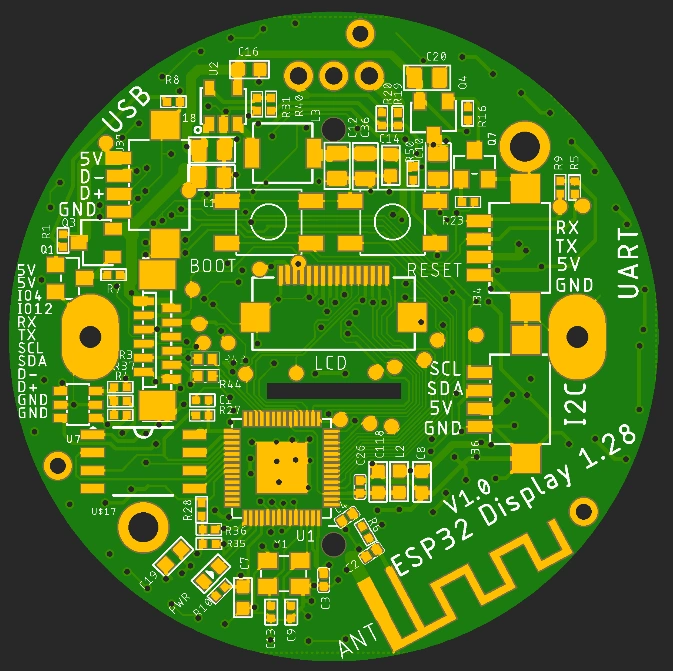
The 5V charging interface supports power supply and program burning, and is also equipped with three expansion interfaces of UART, I2C, and FPC to meet development needs.
The atmosphere light design adds a cool feeling, and the low power design makes it suitable for smart home appliances and portable devices.
It supports Arduino IDE, Espressif IDF, Lua RTOS, Home Assistant/PlatformIO/Micro python, and supports LVGL library; you can design the UI interface yourself, it is an ideal platform for DIY projects.
ESP32 Display - 1.28inch rotary screen is not just an interactive module, but an intelligent interaction solution that combines high performance, multi-function, and ease of use. Whether you are an IoT developer, smart home enthusiast, or professional, you can find an efficient tool that meets your needs.
Self-developed by Elecrow with exclusive design.
Specification
| Main Chip: ESP32-S3R8 | |
|---|---|
| Processor | Equipped with high-performance Xtensa 32-bit LX7 dual-core processor, with a main frequency of up to 240MHz |
| System memory | 512KB SRAM、8M PSRAM |
| Storage | 16M Flash |
| Screen | |
| Size | 1.28 inch |
| Screen Type | IPS |
| Touch Type | Capacitive Touch |
| Resolution | 240*240 |
| Wireless Communication | |
| Bluetooth | Bluetooth Low Energy and Bluetooth 5.0 |
| WiFi | Support 802.11a/b/g/n,2.4GH |
| Hardware | |
| UART Interface | 2x UART, 4P 1.25mm |
| I2C interface | 4P 1.25mm |
| FPC connector | 12P, Power supply burning port |
| Button | RESET button, BOOT button, confirmation button (knob press switch) |
| LED Light | Power indicator, LED ambient light |
| Other | |
| Power Input | 5V/1A |
| Operating temperature | -20~65℃ |
| Storage temperature | -40~80℃ |
| Operation Power | Module:DC5V Main Chip:3.3V |
| Size | 48*/48*/33mm |
| Shell | Aluminum alloy + plastic + acrylic |
| Net Weight | 50g |
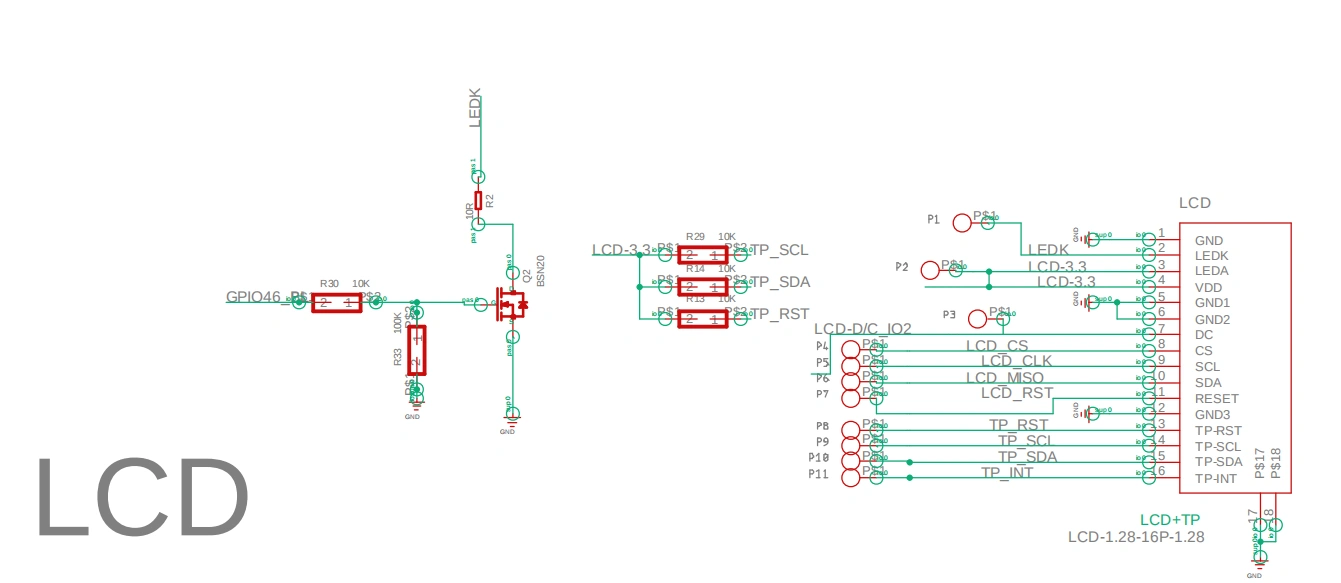
Schematic Diagram:
ESP32-S3 with display and touch schematic diagram
Schematic Diagram:
Definition in the main program:
class LGFX : public lgfx::LGFX_Device {
  lgfx::Panel_GC9A01 _panel_instance;
  lgfx::Bus_SPI _bus_instance;
public:
  LGFX(void) {
    {
      auto cfg = _bus_instance.config();
      cfg.spi_host = SPI2_HOST;
      cfg.spi_mode = 0;
      cfg.freq_write = 80000000;
      cfg.freq_read = 20000000;
      cfg.spi_3wire = true;
      cfg.use_lock = true;
      cfg.dma_channel = SPI_DMA_CH_AUTO;
      cfg.pin_sclk = 10;
      cfg.pin_mosi = 11;
      cfg.pin_miso = -1;
      cfg.pin_dc = 3;
      _bus_instance.config(cfg);
      _panel_instance.setBus(&_bus_instance);
    }
    {
      auto cfg = _panel_instance.config();
      cfg.pin_cs = 9;
      cfg.pin_rst = 14;
      cfg.pin_busy = -1;
      cfg.memory_width = 240;
      cfg.memory_height = 240;
      cfg.panel_width = 240;
      cfg.panel_height = 240;
      cfg.offset_x = 0;
      cfg.offset_y = 0;
      cfg.offset_rotation = 0;
      cfg.dummy_read_pixel = 8;
      cfg.dummy_read_bits = 1;
      cfg.readable = false;
      cfg.invert = true;
      cfg.rgb_order = false;
      cfg.dlen_16bit = false;
      cfg.bus_shared = false;
      _panel_instance.config(cfg);
    }
    setPanel(&_panel_instance);
  }
};
LGFX gfx;
CST816D touch(TP_I2C_SDA_PIN, TP_I2C_SCL_PIN, TP_RST, TP_INT);
- Display (GC9A01 SPI): SCLK=10, MOSI=11, MISO=-1, DC=3, CS=9, RST=14
- Screen backlight: SCREEN_BACKLIGHT_PIN=46
- Touchscreen (CST816D I2C): SDA=6, SCL=7, INT=5, RST=13
- OLED (SSD1306 I2C): SDA=38, SCL=39
- RGB LED (WS2812): LED_PIN=48, LED_NUM=5
- Rotary encoder: A (ENCODER_A_PIN) = 45, B (ENCODER_B_PIN) = 42, SW (SWITCH_PIN) = 41
- Power indicator: POWER_LIGHT_PIN = 40
- Test I/O: 4, 12
Use the configuration guide:
Get Started with Arduino IDE
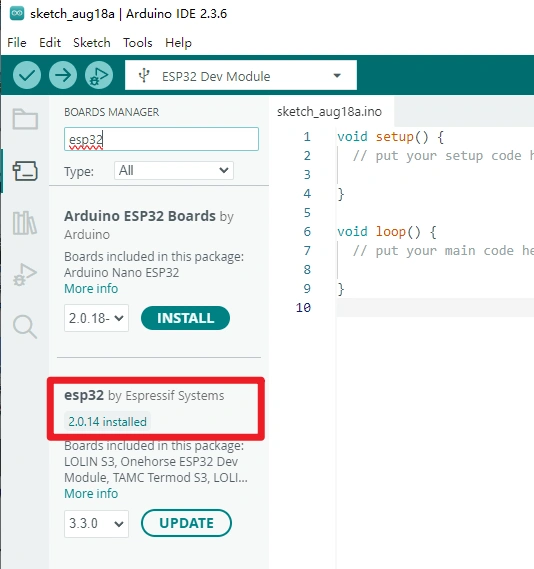
Please note that the version of esp32 supported by the sample code provided with this product is 2.0.14.
Please click the card below to learn how to install Arduino IDE, and install ESP32 board in the Arduino IDE.
Introduction to the factory default sample program:
display effect
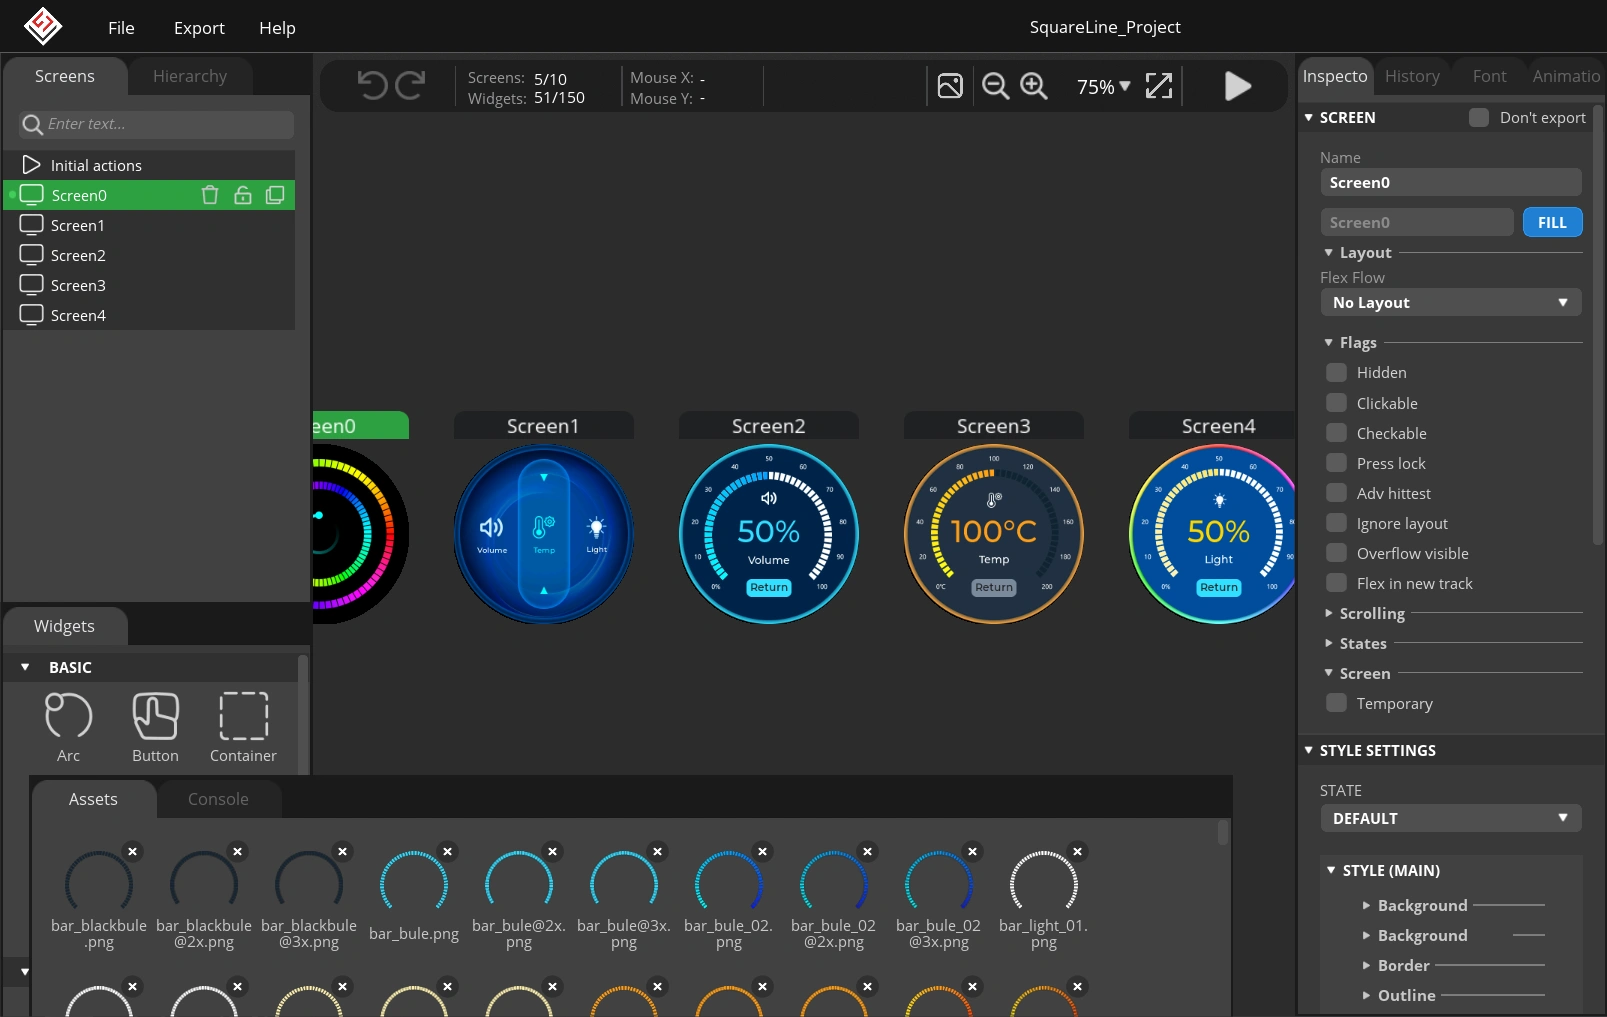
Design UI file with SquareLine Studio
Get Started with SquareLine Studio
Please click the card below to learn how to download the SquareLine Studio, and Simple operating instructions.
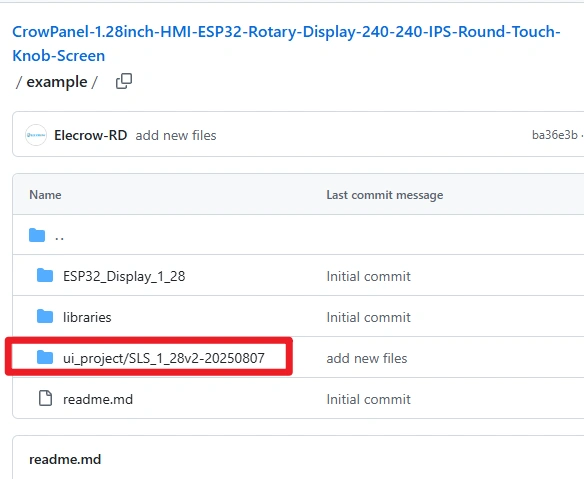
UI engineering files and code resources currently available on GitHub:
CrowPanel-1.28inch-HMI-ESP32-Rotary-Display-240-240-IPS-Round-Touch-Knob-Screen
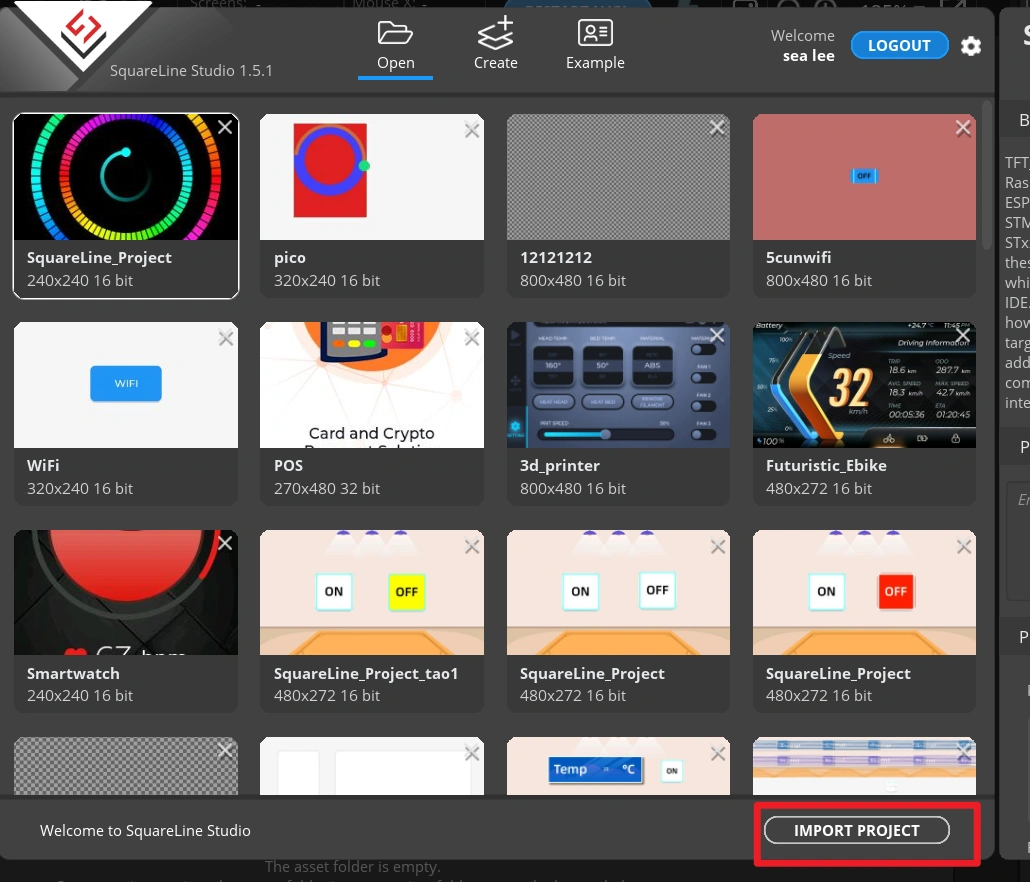
Importing UI projects using SquareLine Studio:
Click “Import Project” in the lower right corner to import the UI project we provided.
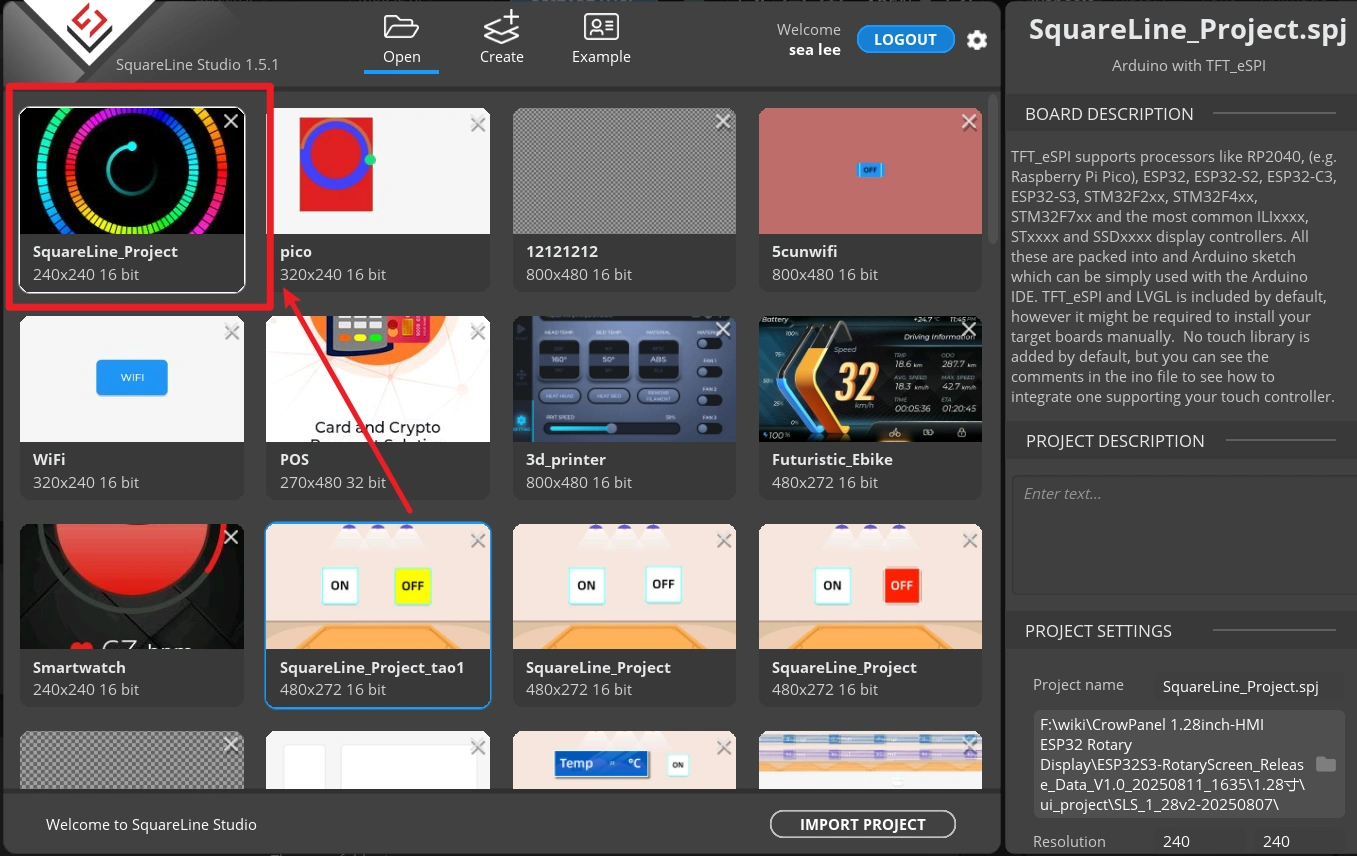
After importing, the project will appear in the list. Double-click to open the factory.
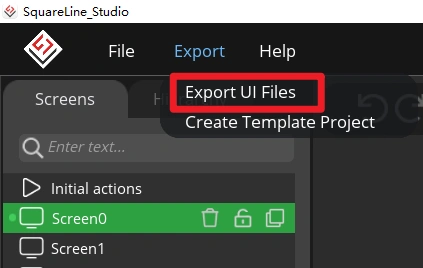
You can directly export UI files, use the UI files we provide, or modify the UI project yourself to customize your settings.
Main program introduction section
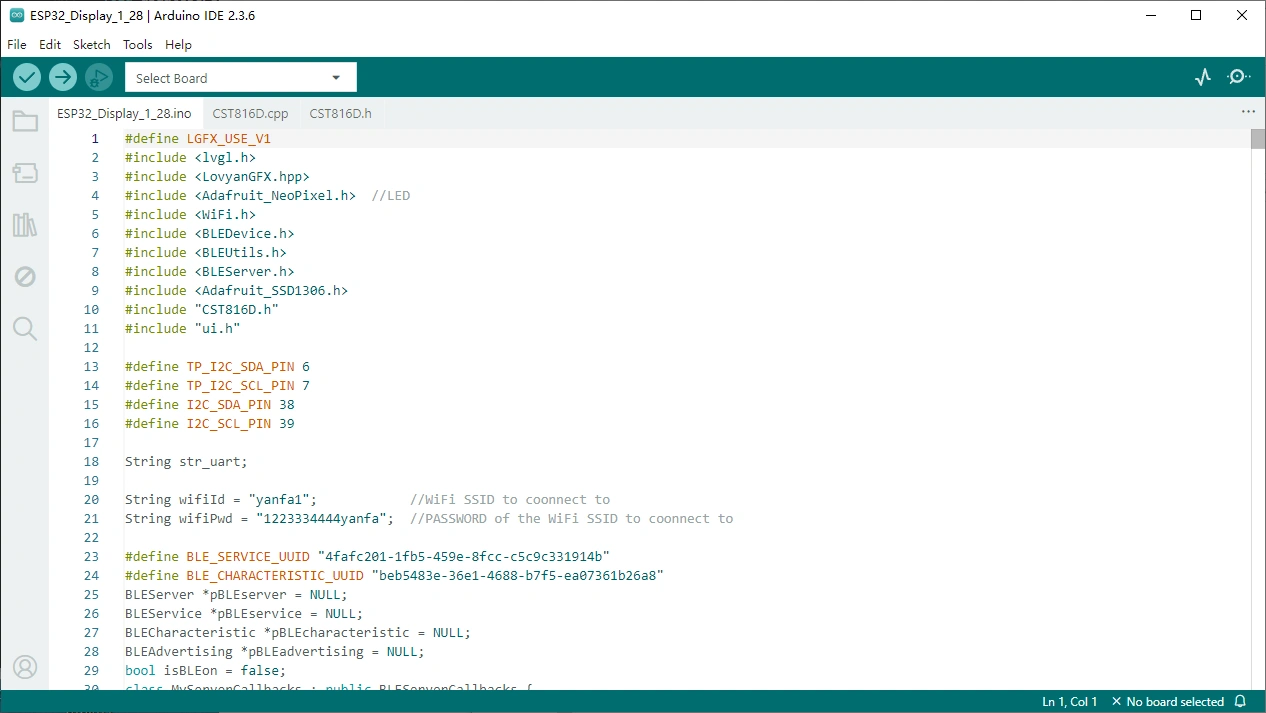
Click on the GitHub link  to download the code, and use Arduino to open.
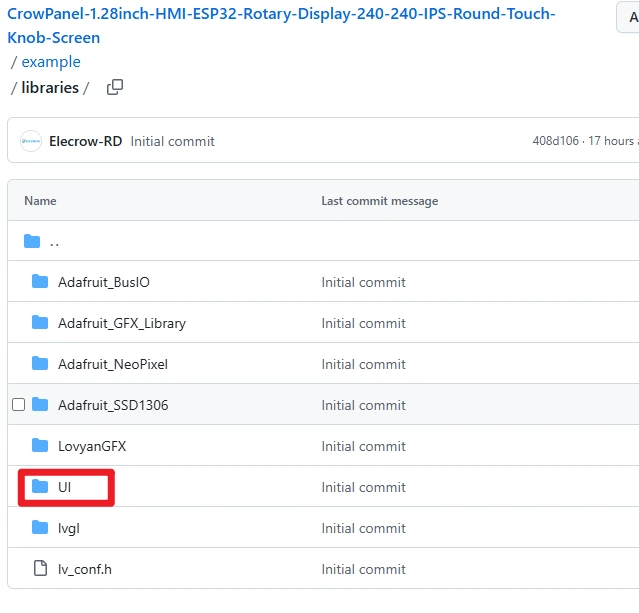
Click on the GitHub link  to download the library and UI files we provide, and place these files in the libraries folder..
Then click "File" -> "Preferences" -> "Setting" to check the sketchbook location. Place the libraries downloaded to the sketchbook location.
Core Hardware
Main Control Chip: ESP32S3
Display: 1.28-inch circular TFT screen (240x240 resolution)
Display Driver: GC9A01 chip
Touchscreen: CST816D capacitive touch controller
Rotary Encoder: Rotary encoder with button
RGB LED: 5 WS2812B LED lights
OLED Display: 128x64 SSD1306 OLED display
①Main library dependencies
LVGL: Graphics user interface library
LovyanGFX: Display driver library
Adafruit_NeoPixel: RGB LED control
WiFi: WiFi connectivity functionality
BLE: Bluetooth Low Energy functionality
Adafruit_SSD1306: OLED display driver
#define LGFX_USE_V1
#include <lvgl.h>
#include <LovyanGFX.hpp>
#include <Adafruit_NeoPixel.h>  *//LED*
#include <WiFi.h>
#include <BLEDevice.h>
#include <BLEUtils.h>
#include <BLEServer.h>
#include <Adafruit_SSD1306.h>
#include "CST816D.h"
#include "ui.h"
②Pin definitions
// Touchscreen pins
#define TP_I2C_SDA_PIN 6
#define TP_I2C_SCL_PIN 7
#define TP_INT 5
#define TP_RST 13

// Main I2C pin
#define I2C_SDA_PIN 38
#define I2C_SCL_PIN 39

//  Rotary encoder pins
#define ENCODER_A_PIN 45
#define ENCODER_B_PIN 42
#define SWITCH_PIN 41

// LED and backlight control
#define LED_PIN 48
#define SCREEN_BACKLIGHT_PIN 46
#define POWER_LIGHT_PIN 40
③Multitasking architecture
The project uses the FreeRTOS multitasking system, which includes the following tasks:
lcdTestTask: LCD display test task
ledTestTask: LED lighting effect control task
encTask: Rotary encoder processing task
ioForTestTask: IO test task
④User Interaction Flow
Main Interface Operations
Rotate to Select: Rotate the encoder on the main interface to select a function (volume/temperature/brightness).
void encTask(void *pvParameters) {
  while (1) {

    // Read the current state of CLK
    currentStateCLK = digitalRead(ENCODER_A_PIN);

    // If last and current state of CLK are different, then pulse occurred
    // React to only 1 state change to avoid double count
    if (currentStateCLK != lastStateCLK && currentStateCLK == 1) {
      current_screen = lv_scr_act();
      // If the DT state is different than the CLK state then
      // the encoder is rotating CCW so decrement
      if (digitalRead(ENCODER_B_PIN) != currentStateCLK) {
        if (abs(last_counter - counter) > 10) {
          continue;
        }
        position_tmp = 1;
        ...
      } else {
        ...
        position_tmp = 0;
        counter--;
        currentDir = "CW";
      }

      ...
      processEncoder();
    }

    // Remember last CLK state
    lastStateCLK = currentStateCLK;
    ...
  }
}
Single Click to Enter: Click the button to enter the corresponding function interface
Single-click action:
void performClickAction() {
  // Serial.println("Click");
  current_screen = lv_scr_act();
  if (current_screen == ui_Screen1) {
    if (screen1_index == 0) {
      _ui_screen_change(&ui_Screen2, LV_SCR_LOAD_ANIM_FADE_ON, 200, 0, &ui_Screen2_screen_init);
    } else if (screen1_index == 1) {
      _ui_screen_change(&ui_Screen3, LV_SCR_LOAD_ANIM_FADE_ON, 200, 0, &ui_Screen3_screen_init);
    } else if (screen1_index == 2) {
      _ui_screen_change(&ui_Screen4, LV_SCR_LOAD_ANIM_FADE_ON, 200, 0, &ui_Screen4_screen_init);
    }
  }
}
Single-click detection trigger logic
if (clickCount == 1 && millis() - lastPressTime > doubleClickTime) {
  Serial.println("click ");
  performClickAction();
  clickCount = 0;
}
Key press interrupt count (for single/double clicks)
void IRAM_ATTR buttonISR() {
  static unsigned long lastInterruptTime = 0;
  unsigned long interruptTime = millis();
  if (interruptTime - lastInterruptTime > debounceTime) {
    if (digitalRead(SWITCH_PIN)) {
      pressFlag = false;
    } else {
      pressFlag = true;
      lastPressTime = interruptTime;
      clickCount++;
    }
  }
  lastInterruptTime = interruptTime;
}
Double Click to Return: Double-click in the function interface to return to the main interface
Double-click action (return from the function screen to the main screen)
void performDoubleClickAction() {
  // Serial.println("DoubleClick");
  current_screen = lv_scr_act();
  if (current_screen == ui_Screen2 || current_screen == ui_Screen3 || current_screen == ui_Screen4) {
    _ui_screen_change(&ui_Screen1, LV_SCR_LOAD_ANIM_FADE_ON, 200, 0, &ui_Screen1_screen_init);
  }
}
Double-click detection trigger logic
if (clickCount >= 2) {
  Serial.println("double click");
  performDoubleClickAction();
  clickCount = 0;
}
Function Interface Operations
Volume Control: Rotate to adjust the volume percentage (0-100%)
Increase:
if (current_screen == ui_Screen2) {
  int currentVol = lv_arc_get_value(ui_VolumeArc);
  Serial.printf(" ++ currentVol = %d\n", currentVol);
  int newVol = (currentVol + 5) > 100 ? 100 : currentVol + 5;
  Serial.printf(" ++ END currentVol = %d\n", newVol);
  lv_arc_set_value(ui_VolumeArc, newVol);
  char volText[8];
  if (newVol == 100) {
    snprintf(volText, sizeof(volText), "%d%%", newVol);
    lv_label_set_text(ui_VolNum, volText);
  } else {
    snprintf(volText, sizeof(volText), " %d%%", newVol);
    lv_label_set_text(ui_VolNum, volText);
  }
}
Reduce:
if (current_screen == ui_Screen2) {
  int currentVol = lv_arc_get_value(ui_VolumeArc);
  Serial.printf(" -- currentVol = %d\n", currentVol);
  int newVol = (currentVol - 5) < 0 ? 0 : currentVol - 5;
  Serial.printf(" -- END currentVol = %d\n", newVol);
  lv_arc_set_value(ui_VolumeArc, newVol);
  char volText[8];
  if (newVol == 100) {
    snprintf(volText, sizeof(volText), "%d%%", newVol);
    lv_label_set_text(ui_VolNum, volText);
  } else {
    snprintf(volText, sizeof(volText), " %d%%", newVol);
    lv_label_set_text(ui_VolNum, volText);
  }
}
Temperature Control: Rotate to adjust the temperature value (0-200°C)
Increase:
} else if (current_screen == ui_Screen3) {
  int currentTemp = lv_arc_get_value(ui_TempArc);
  Serial.printf(" ++ currentVol = %d\n", currentTemp);
  int newTemp = (currentTemp + 5) > 200 ? 200 : currentTemp + 5;
  Serial.printf(" ++ END currentVol = %d\n", newTemp);
  lv_arc_set_value(ui_TempArc, newTemp);
  char TempText[8];
  if (newTemp >= 100 && newTemp <= 200) {
    snprintf(TempText, sizeof(TempText), "%d%°C", newTemp);
    lv_label_set_text(ui_TempNum, TempText);
  } else {
    snprintf(TempText, sizeof(TempText), " %d%°C", newTemp);
    lv_label_set_text(ui_TempNum, TempText);
  }
}
Reduce:
} else if (current_screen == ui_Screen3) {
  int currentTemp = lv_arc_get_value(ui_TempArc);
  Serial.printf(" -- currentVol = %d\n", currentTemp);
  int newTemp = (currentTemp - 5) < 0 ? 0 : currentTemp - 5;
  Serial.printf(" -- END currentVol = %d\n", newTemp);
  lv_arc_set_value(ui_TempArc, newTemp);
  char TempText[8];
  if (newTemp >= 100 && newTemp <= 200) {
    snprintf(TempText, sizeof(TempText), "%d%°C", newTemp);
    lv_label_set_text(ui_TempNum, TempText);
  } else {
    snprintf(TempText, sizeof(TempText), " %d%°C", newTemp);
    lv_label_set_text(ui_TempNum, TempText);
  }
}
Brightness Control: Rotate to adjust the screen brightness (0-100%)
Increase (including backlight PWM)
} else if (current_screen == ui_Screen4) {
  int currentLight = lv_arc_get_value(ui_lightArc);
  Serial.printf(" ++ currentLight = %d\n", currentLight);
  int newLight = (currentLight + 5) > 100 ? 100 : currentLight + 5;
  Serial.printf(" ++ END currentLight = %d\n", newLight);
  lv_arc_set_value(ui_lightArc, newLight);
  char LightText[8];
  if (newLight == 100) {
    snprintf(LightText, sizeof(LightText), "%d%%", newLight);
    lv_label_set_text(ui_LightNum, LightText);
  } else {
    snprintf(LightText, sizeof(LightText), " %d%%", newLight);
    lv_label_set_text(ui_LightNum, LightText);
  }
  int pwm_value = (newLight * 255) / 100;
  ledcSetup(pwmChannel, pwmFreq, pwmResolution);
  ledcAttachPin(SCREEN_BACKLIGHT_PIN, pwmChannel);
  ledcWrite(pwmChannel, pwm_value);
}
Reduce (including backlight PWM)
} else if (current_screen == ui_Screen4) {
  int currentLight = lv_arc_get_value(ui_lightArc);
  Serial.printf(" -- currentLight = %d\n", currentLight);
  int newLight = (currentLight - 5) < 0 ? 0 : currentLight - 5;
  Serial.printf(" -- END currentLight = %d\n", newLight);
  lv_arc_set_value(ui_lightArc, newLight);
  char LightText[8];
  if (newLight == 100) {
    snprintf(LightText, sizeof(LightText), "%d%%", newLight);
    lv_label_set_text(ui_LightNum, LightText);
  } else {
    snprintf(LightText, sizeof(LightText), " %d%%", newLight);
    lv_label_set_text(ui_LightNum, LightText);
  }
  int pwm_value = (newLight * 255) / 100;
  ledcSetup(pwmChannel, pwmFreq, pwmResolution);
  ledcAttachPin(SCREEN_BACKLIGHT_PIN, pwmChannel);
  ledcWrite(pwmChannel, pwm_value);
}
Upload the Code
-
After completing the installation of the ESP32 board according to "Get Started with Arduino IDE" and the installation of the library according to "Install Libraries", open the program and connect the CrowPanel 1.28inch-HMI ESP32 Rotary Display to the computer via a USB-C cable.
-
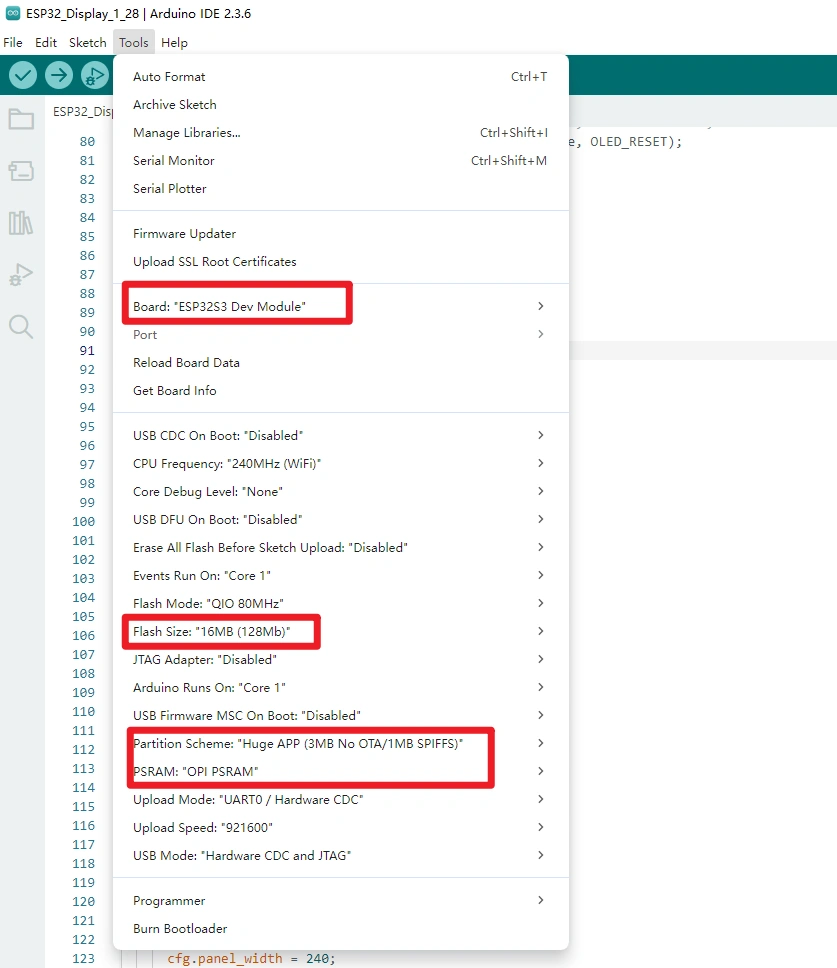
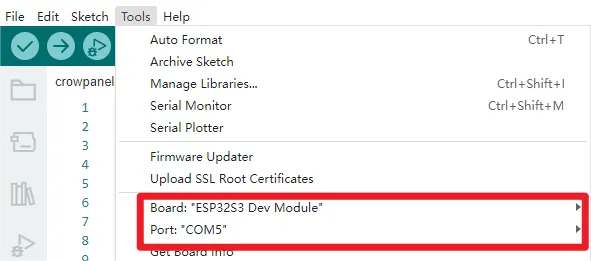
Select Board: click "Tools" -> "Board" -> "esp32" and select "ESP32S3 Dev Module",Under the "Tools" menu, see "Flash Size" select 16MB(128Mb); "Partition scheme" and select "Huge APP(3MB No OTA/1MB SPIFFS)"; "PSRAM" select "OPI PSRAM"
Note: The factory program here contains a lot of content, and the app0 partition is too small. It needs to be repartitioned. Refer to this document for partitioning instructions.
modify sizes of app0 and spiffs.pdf
3.Select Port
4.Upload the code: click the "Upload" icon to upload the code.
Display effect:
Important Notes for Downloading Programs:
Before downloading any program, you must press the boot button before powering on, Then select the corresponding serial port number to download the program.
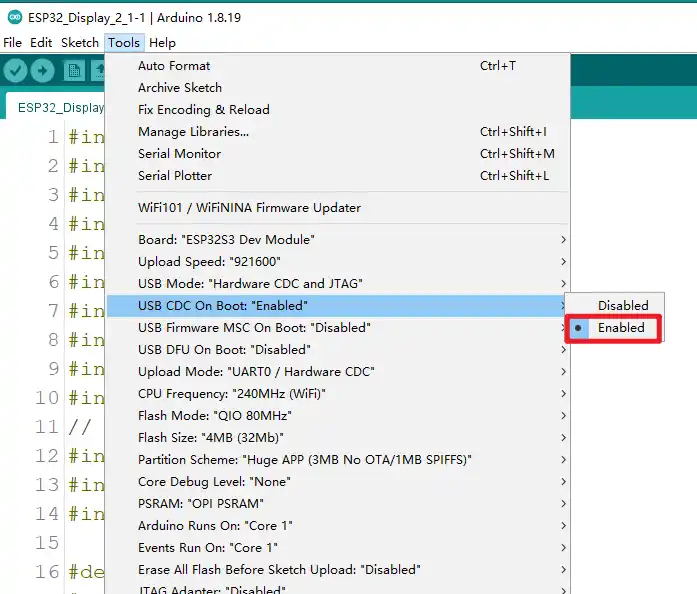
①When using the USB-5v-IN port for direct program download, if you need to send or receive data via the serial port, you must enable “USB CDC ON BOOT” in the download settings section of the tool.
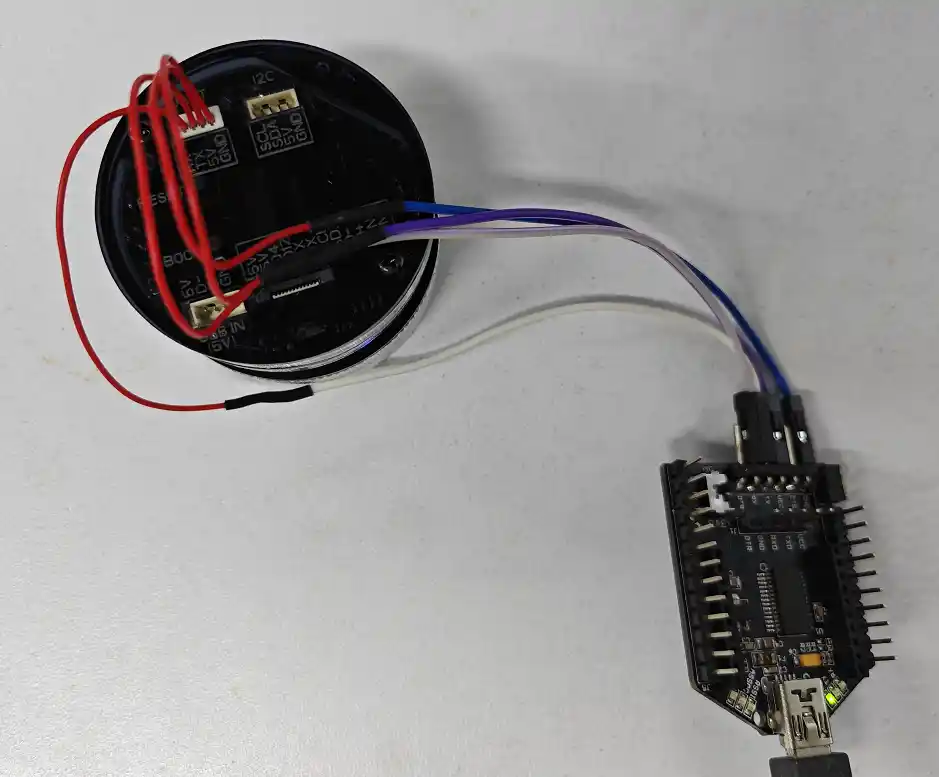
②When using UART to download programs, a USB-to-TTL converter is required. When viewing serial port data, there is no need to enable USB CDC on boot.
Simple example:
RGB_CODE:
The example provides the minimum required RGB LED control, including three basic effects: solid color, running light, and breathing light.
#include <Adafruit_NeoPixel.h>

#define LED_PIN 48
#define LED_NUM 5
#define DEFAULT_BRIGHTNESS 25

Adafruit_NeoPixel strip = Adafruit_NeoPixel(LED_NUM, LED_PIN, NEO_GRB + NEO_KHZ800);

void setAll(uint8_t r, uint8_t g, uint8_t b) {
  for (int i = 0; i < LED_NUM; i++) {
    strip.setPixelColor(i, strip.Color(r, g, b));
  }
  strip.show();
}

void clearAll() {
  strip.clear();
  strip.show();
}

void colorChase(uint32_t color, uint16_t stepDelayMs, uint8_t rounds) {
  for (uint8_t round = 0; round < rounds; round++) {
    for (int i = 0; i < LED_NUM; i++) {
      strip.clear();
      strip.setPixelColor(i, color);
      strip.show();
      delay(stepDelayMs);
    }
  }
}

void breathe(uint32_t color, uint8_t maxBrightness /*0-255*/, uint8_t cycles, uint16_t stepDelayMs) {
  // Save current brightness
  uint8_t original = strip.getBrightness();
  for (uint8_t c = 0; c < cycles; c++) {
    for (uint8_t b = 0; b <= maxBrightness; b++) {
      strip.setBrightness(b);
      for (int i = 0; i < LED_NUM; i++) strip.setPixelColor(i, color);
      strip.show();
      delay(stepDelayMs);
    }
    for (int b = maxBrightness; b >= 0; b--) {
      strip.setBrightness((uint8_t)b);
      for (int i = 0; i < LED_NUM; i++) strip.setPixelColor(i, color);
      strip.show();
      delay(stepDelayMs);
    }
  }
  strip.setBrightness(original);
  strip.show();
}

void setup() {
  strip.begin();
  strip.setBrightness(DEFAULT_BRIGHTNESS);
  strip.clear();
  strip.show();
}

void loop() {
  // 1) Solid colors
  setAll(255, 0, 0);   // Red
  delay(1000);
  setAll(0, 255, 0);   // Green
  delay(1000);
  setAll(0, 0, 255);   // Blue
  delay(1000);

  // 2) White chase
  colorChase(strip.Color(255, 255, 255), 150, 3);

  // 3) Breathing purple
  breathe(strip.Color(130, 0, 255), 50, 3, 20);

  // Pause then repeat
  clearAll();
  delay(500);
}
Display effect:
Encoder_code:
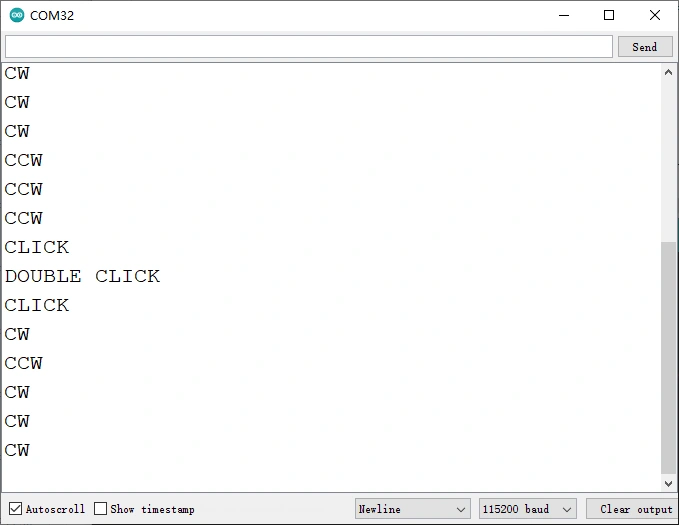
Encoder sample program, which only outputs the rotation direction (CW/CCW) and button clicks (single click/double click) to the serial port.
#define ENCODER_A_PIN 45
#define ENCODER_B_PIN 42
#define SWITCH_PIN 41

volatile unsigned long lastPressTime = 0;
volatile int clickCount = 0;
const unsigned long debounceTime = 20;       // ms
const unsigned long doubleClickTime = 300;   // ms

void IRAM_ATTR buttonISR() {
  static unsigned long lastInterruptTime = 0;
  unsigned long interruptTime = millis();
  if (interruptTime - lastInterruptTime > debounceTime) {
    if (!digitalRead(SWITCH_PIN)) {     // active low
      lastPressTime = interruptTime;
      clickCount++;
    }
  }
  lastInterruptTime = interruptTime;
}

int currentStateCLK = 0;
int lastStateCLK = 0;

void setup() {
  Serial.begin(115200);

  pinMode(ENCODER_A_PIN, INPUT);
  pinMode(ENCODER_B_PIN, INPUT);
  pinMode(SWITCH_PIN, INPUT_PULLUP);
  attachInterrupt(digitalPinToInterrupt(SWITCH_PIN), buttonISR, CHANGE);

  lastStateCLK = digitalRead(ENCODER_A_PIN);
  Serial.println("Encoder Minimal Demo (A=45, B=42, SW=41)");
}

void loop() {
  // Read encoder A
  currentStateCLK = digitalRead(ENCODER_A_PIN);

  // Detect rising edge on A
  if (currentStateCLK != lastStateCLK && currentStateCLK == HIGH) {
    bool ccw = (digitalRead(ENCODER_B_PIN) != currentStateCLK);
    if (ccw) {
      Serial.println("CCW");
    } else {
      Serial.println("CW");
    }
  }
  lastStateCLK = currentStateCLK;

  // Click / Double-click detection
  if (clickCount == 1 && millis() - lastPressTime > doubleClickTime) {
    Serial.println("CLICK");
    clickCount = 0;
  } else if (clickCount >= 2) {
    Serial.println("DOUBLE CLICK");
    clickCount = 0;
  } else if (clickCount > 2) {
    clickCount = 0;
  }

  delay(10);
}
Resource:
github:
CrowPanel-1.28inch-HMI-ESP32-Rotary-Display-240-240-IPS-Round-Touch-Knob-Screen
How to buy
Please visit this page to purchase CrowPanel 1.28inch-HMI ESP32 Rotary Display 240*240 IPS Round Touch Knob Screen.
Support
If you have any problem about how to use it, you can connect to us at the bottom-right of bazzer or contact to techsupport@elecrow.com to get technology support.
